This is Part I of a multi-part series. Below are the links to other parts of this tutorial!
- Unit Testing Tutorial Part I: Introduction to PHPUnit
- Unit Testing Tutorial Part II: Assertions, Writing a Useful Test and @dataProvider
- Unit Testing Tutorial Part III: Testing Protected/Private Methods, Coverage Reports and CRAP
- Unit Testing Tutorial Part IV: Mock Objects, Stub Methods and Dependency Injection
- Unit Testing Tutorial Part V: Mock Methods and Overriding Constructors
For months now I have been telling myself I would create an in-depth, multi-part series of articles that would take a developer from being a complete newbie at testing to have them mocking classes left and right and asserting until the break of dawn.
This series will introduce you to the core concepts of testing. It will tell you why statics are bad, why dependency injection is king, what the difference between a mock and a stub is and how to love the red and green bar.
I will lightly touch on test-driven development but will not focus on it as I believe writing your code to be testable and learning how to actually test is a big enough challenge to learn at first without throwing in a completely different method to your development process. Baby steps is the name of the game.
What this series will not go over is why you should test, why testing is good and the benefits of testing, other than a slight glossing over.
If you would like to be serenaded with the virtues of testing then I recommend you check out the book Real-World Solutions for Developing High-Quality PHP Frameworks and Applications by Sebastian Bergmann and check out my buddy Chris Hartjes, The Grumpy Programmer’s blog. Chris has been screaming at the PHP community for years that they should test. He is now holding classes to teach you some knowledge and I wholeheartedly recommend you take a good look.
BEFORE YOU BEGIN
This series will assume you have a proper development environment set up. I highly recommend using a VM that mimics a server environment instead of having your server running alongside your daily OS. If you do not have a proper environment set up then I recommend you read through my Setting Up a Debian VM, Step by Step guide to get you up and running painlessly.
We are also going to use the command line to run … commands. If you are used to a GUI doing everything for you, it is high time you cowboy up and got to loving the terminal.
INSTALLING PHPUNIT
It used to be that the recommended way of installing PHPUnit was through PEAR. Now that Composer has come and taken the crown of package manager I suggest you go with it.
If you do not know what Composer is or how to use it then you should read my previous article, Composer Namespaces in 5 Minutes. It introduces you to Composer in general and how it utilizes PSR-0 for autoloading.
All it takes to install PHPUnit is a single line in your composer.json file:
1
2
3
4
5
{
    "require-dev": {
        "phpunit/phpunit": "3.7.14"
    }
}
You should also install XDebug. If you are not using using Xdebug then head over to Xdebug and You: Why You Should be Using a Real Debugger and stop being a caveman. It is a much better alternative to trashing your codebase with echo and print_r and var_dump and it is also required to utilize PHPUnit’s awesome code coverage report tools!
To make Composer download your new libraries simply run $ ./composer.phar update --dev and Composer will work its magic for you.
RUNNING PHPUNIT
Check out ./vendor/bin/phpunit. This is the file you will mostly be interacting with to run PHPUnit. It is extremely simple and to the point - all it does is look for Composer’s autoloader and load it.
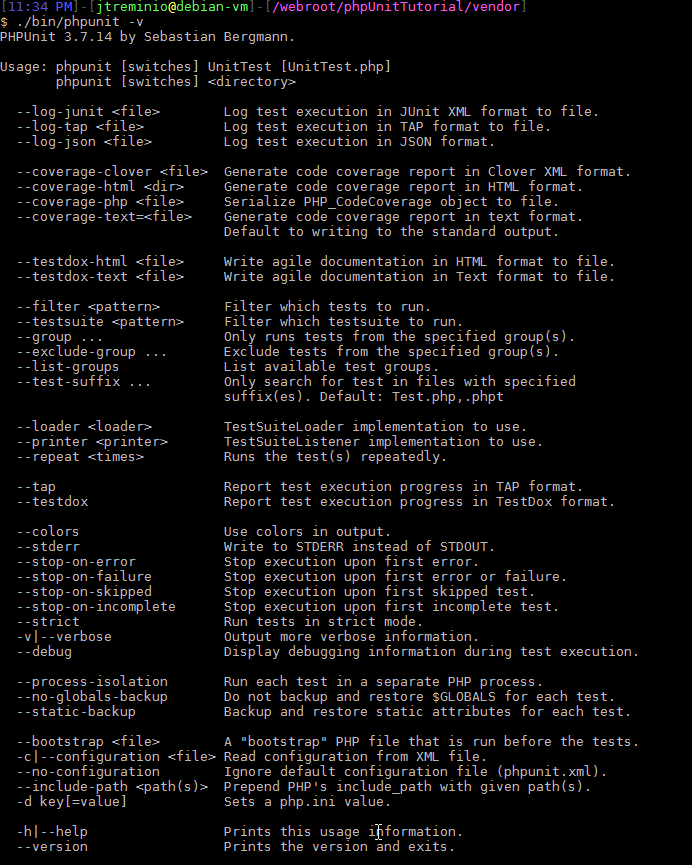
To run PHPUnit, you simply do $ ./vendor/bin/phpunit. This will print all options available to you.
 |
|---|
| phpunit-options.png |
STRUCTURING THE PROJECT
Since we are using Composer we will take some time to properly setup our project so everything works with the autoloader. We will name the project phpUnitTutorial and will use that as the namespace.
Update your composer.json file to look like this:
1
2
3
4
5
6
7
8
9
10
11
12
{
    "require": {
    },
    "require-dev": {
        "phpunit/phpunit": "3.7.14"
    },
    "autoload": {
        "psr-0": {
            "phpUnitTutorial": ""
        }
    }
}
Then update composer with $ ./composer.phar update. Our project files will live within the phpUnitTutorial folder, which will be on the same level as the vendors folder. Simply create an empty folder so your folder structure looks like:
1
2
3
4
composer.json
composer.phar
phpUnitTutorial/
vendor/
SETTING UP phpunit.xml
Running PHPUnit will go through your tests using built-in defaults. You can override many defaults via the command line, but there is a better way: the phpunit.xml configuration file. Yes, yes, “Ewwww XML!”. I usually say the same thing, but this file is fairly painless.
In the root of your project create a phpunit.xml with the following contents:
1
2
3
4
5
6
7
8
<?xml version="1.0" encoding="UTF-8"?>
<phpunit colors="true">
    <testsuites>
        <testsuite name="Application Test Suite">
            <directory>./phpUnitTutorial/Test/</directory>
        </testsuite>
    </testsuites>
</phpunit>
This is an extremely slim, simple configuration file, but it sets two important options:
colors="true" makes sure your test results are in color, and
<directory>./phpUnitTutorial/Test/</directory> tells PHPUnit where your tests will be located, so you don’t have to manually tell it every time you run your tests.
You have not created this folder, so do so now. Your file structure should look like:
1
2
3
4
5
composer.json
composer.phar
phpUnitTutorial/
phpUnitTutorial/Test/
vendor/
All your application’s tests should go within phpUnitTutorial/Test.
CONVENTIONS
PHPUnit has a few conventions to make your life easier. You do not necessarily have to follow them if you want to do things slightly differently, but for our purposes we are going to stick to them.
File structure and filenames
The first convention we will discuss is the file structure and filenames.
Your tests should mirror your codebase directly but within its own folder, and test files must match the file they are testing, with Test appended. In our example, if we had the following code:
1
2
3
./phpUnitTutorial/Foo.php
./phpUnitTutorial/Bar.php
./phpUnitTutorial/Controller/Baz.php
Our tests would be structured as:
1
2
3
./phpUnitTutorial/Test/FooTest.php
./phpUnitTutorial/Test/BarTest.php
./phpUnitTutorial/Test/Controller/BazTest.php
Classnames
Classnames are exactly the same as filenames. Whatever you have named your file should be the name of your class - which should be true for your non-test code anyway!
Method (test) names
Your test method names should start with test, in lower case. Method names should be descriptive of what is being tested, and should include the name of the method being tested. This is not a place for short, abbreviated method names.
For example, if you are testing a method called verifyAccount(), and in one unit test you want to test that the password matches, you would name your test testVerifyAccountMatchesPasswordGiven().
Verbosity is a boon when testing, because when you have a failing test, and you will have many failing tests, you will be appreciative of seeing the method name and knowing exactly what failed.
Methods must be public
PHPUnit is unable to run tests that are either protected or private - they must be public. Likewise, any methods you create as helpers must be public. We are not building a public API here, we just want to write tests so do not worry about visibility.
Extends PHPUnit
Duh! Your classes must extend the PHPUnit_Framework_TestCase class, or extend a class that does.
FIRST TEST
Our first test will be short and stupid, but it will introduce to you the very minimum required for a test.
Create a new file at ./phpUnitTutorial/Test/StupidTest.php:
1
2
3
4
5
6
7
8
<?php

namespace phpUnitTutorial\Test;

class StupidTest extends \PHPUnit_Framework_TestCase
{
    //
}
This is nothing special - just your run of the mill class. Notice how we are already following three conventions, though.
To get our feet wet, we want to verify that something equals true. Assertions are the true power of PHPUnit, and I will be covering them more in upcoming parts of this series.
For now, create a method testTrueIsTrue. You can already feel the stupid, right?
1
2
3
4
5
6
7
<?php
// ...

public function testTrueIsTrue()
{
    //
}
Now comes the actual test code. It is as simple as it looks, so try not to over-think what is going on:
1
2
3
4
5
6
7
8
<?php
// ...

public function testTrueIsTrue()
{
    $foo = true;
    $this->assertTrue($foo);
}
DAT GREEN BAR
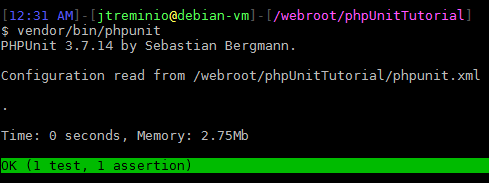
From project root, run PHPUnit: $ vendor/bin/phpunit
You should see the coveted green bar:
 |
|---|
| successful-test.png |
You ran a single test file, 1 test, with a single assertion 1 assertion.
Congratulations, you are now one step closer to joining the ranks of tester!
WRAPPING UP
Today you installed PHPUnit using Composer, set up some sane defaults and even ran your first (stupid) test.
You are now one small step closer to becoming one with the green bar! Congratulations!
I realize the first step looks useless, but it reinforces the idea that testing is not some mythical, high-level concept that requires a PHD to understand. It really is just telling the code, “This is what I expect to happen” and the code letting you know if you have screwed up somewhere.
In the next part, I will explain assertions, introduce annotations including the very powerful dataProvider and walk you through creating your first non-trivial unit test! Joy!
- Previous →
Testing with PHPUnit: My First Presentation! - ← Next
Unit Testing Tutorial Part II: Assertions, Writing a Useful Test and @dataProvider